How to Build Board and Batten Wall: Mudroom Makeover (Part One)
Looking to level up your mudroom? A board and batten wall might be exactly what you need. Of course, board and batten walls look wonderful in a variety of rooms (and hallways), but they are perfect for mudrooms. This classic wall treatment isn’t just about looks – it’s a game-changer for organization, turning chaos into order with a setup of hooks that keep backpacks and coats off the floor. This guide will walk you through how to build this practical feature and share insights on choosing the right mudroom bench and rug to complete the space. And don’t worry if you aren’t construction savvy, these really aren’t that complicated to build!
For our home, this is only part one of our mudroom makeover, but finally getting this part off my to-do list feels great! While there is more to do, finishing the board and batten wall and adding the rug and mudroom bench made our basement mudroom feel a lot more organized, not to mention, a whole lot prettier!
Sure, mudrooms aren’t typically known for their sophistication, but this project proves that function and style aren’t mutually exclusive. The best part? You can knock this out in a weekend, and the results will have you wondering why you didn’t do it sooner.
As an Amazon Associate, I receive a small commission (at no additional cost to you) for qualifying purchases on items purchased through the links in this post.
What Are Board and Batten Walls?
Board and batten walls are a timeless architectural element that involves creating a wall treatment or accent wall made from horizontal and vertical boards. The horizontal part is called the “board” and the vertical parts are the “battens”. Some choose to have their board and batten wall reach all the way to the crown molding on the ceiling, while others do it half or part way up the wall.
Board and batten walls are DIY-friendly and ever-adaptable to changing tastes. They add visual interest, without being overwhelming and you can change the look of them any time you want to refresh your space. You can change the color with paint or wallpaper or you can swap the hardware or surrounding artwork for a new look.
Is Board and Batten Timeless?
Board and batten walls are a classic design element that adds character and charm to almost any space. They have been used in interiors and exteriors for more than a century. According to Marthastewart.com, “Board and batten is thought to have originated in Sweden and Norway, and became popular in North America during the middle of the 19th century,” says Gil Walsh, an interior designer and the founder of GW Interiors. Given that they have never really gone out of favor in many design styles and are still extremely popular today, I would say that board and batten walls are indeed timeless.
There are so many ways to design your board and batten walls. You could add a deep and bold paint color for a more maximalist look. Or add intricated trim molding for some Victorian elegance. Or keep it clean and bright white for a modern, minimal look. Because of that versatility, they work for a variety of interior design styles including farmhouse, Victorian, traditional, transitional, contemporary, cottage, and my personal favorite design styles, modern vintage and organic modern.
The Plan
Our mudroom is in the basement of our 80-year-old house and one of the walls features the exposed concrete of the foundation. I intend to cover that wall one day, but I want to make sure I am doing it correctly, so the concrete can still breathe and moisture doesn’t accumulate. I am considering building a false wall in front of it and adding drywall or using plaster to smooth and level the wall, as was done in the rest of the basement.
After I solve that issue, I’ll move on to adding color, art, and decor.
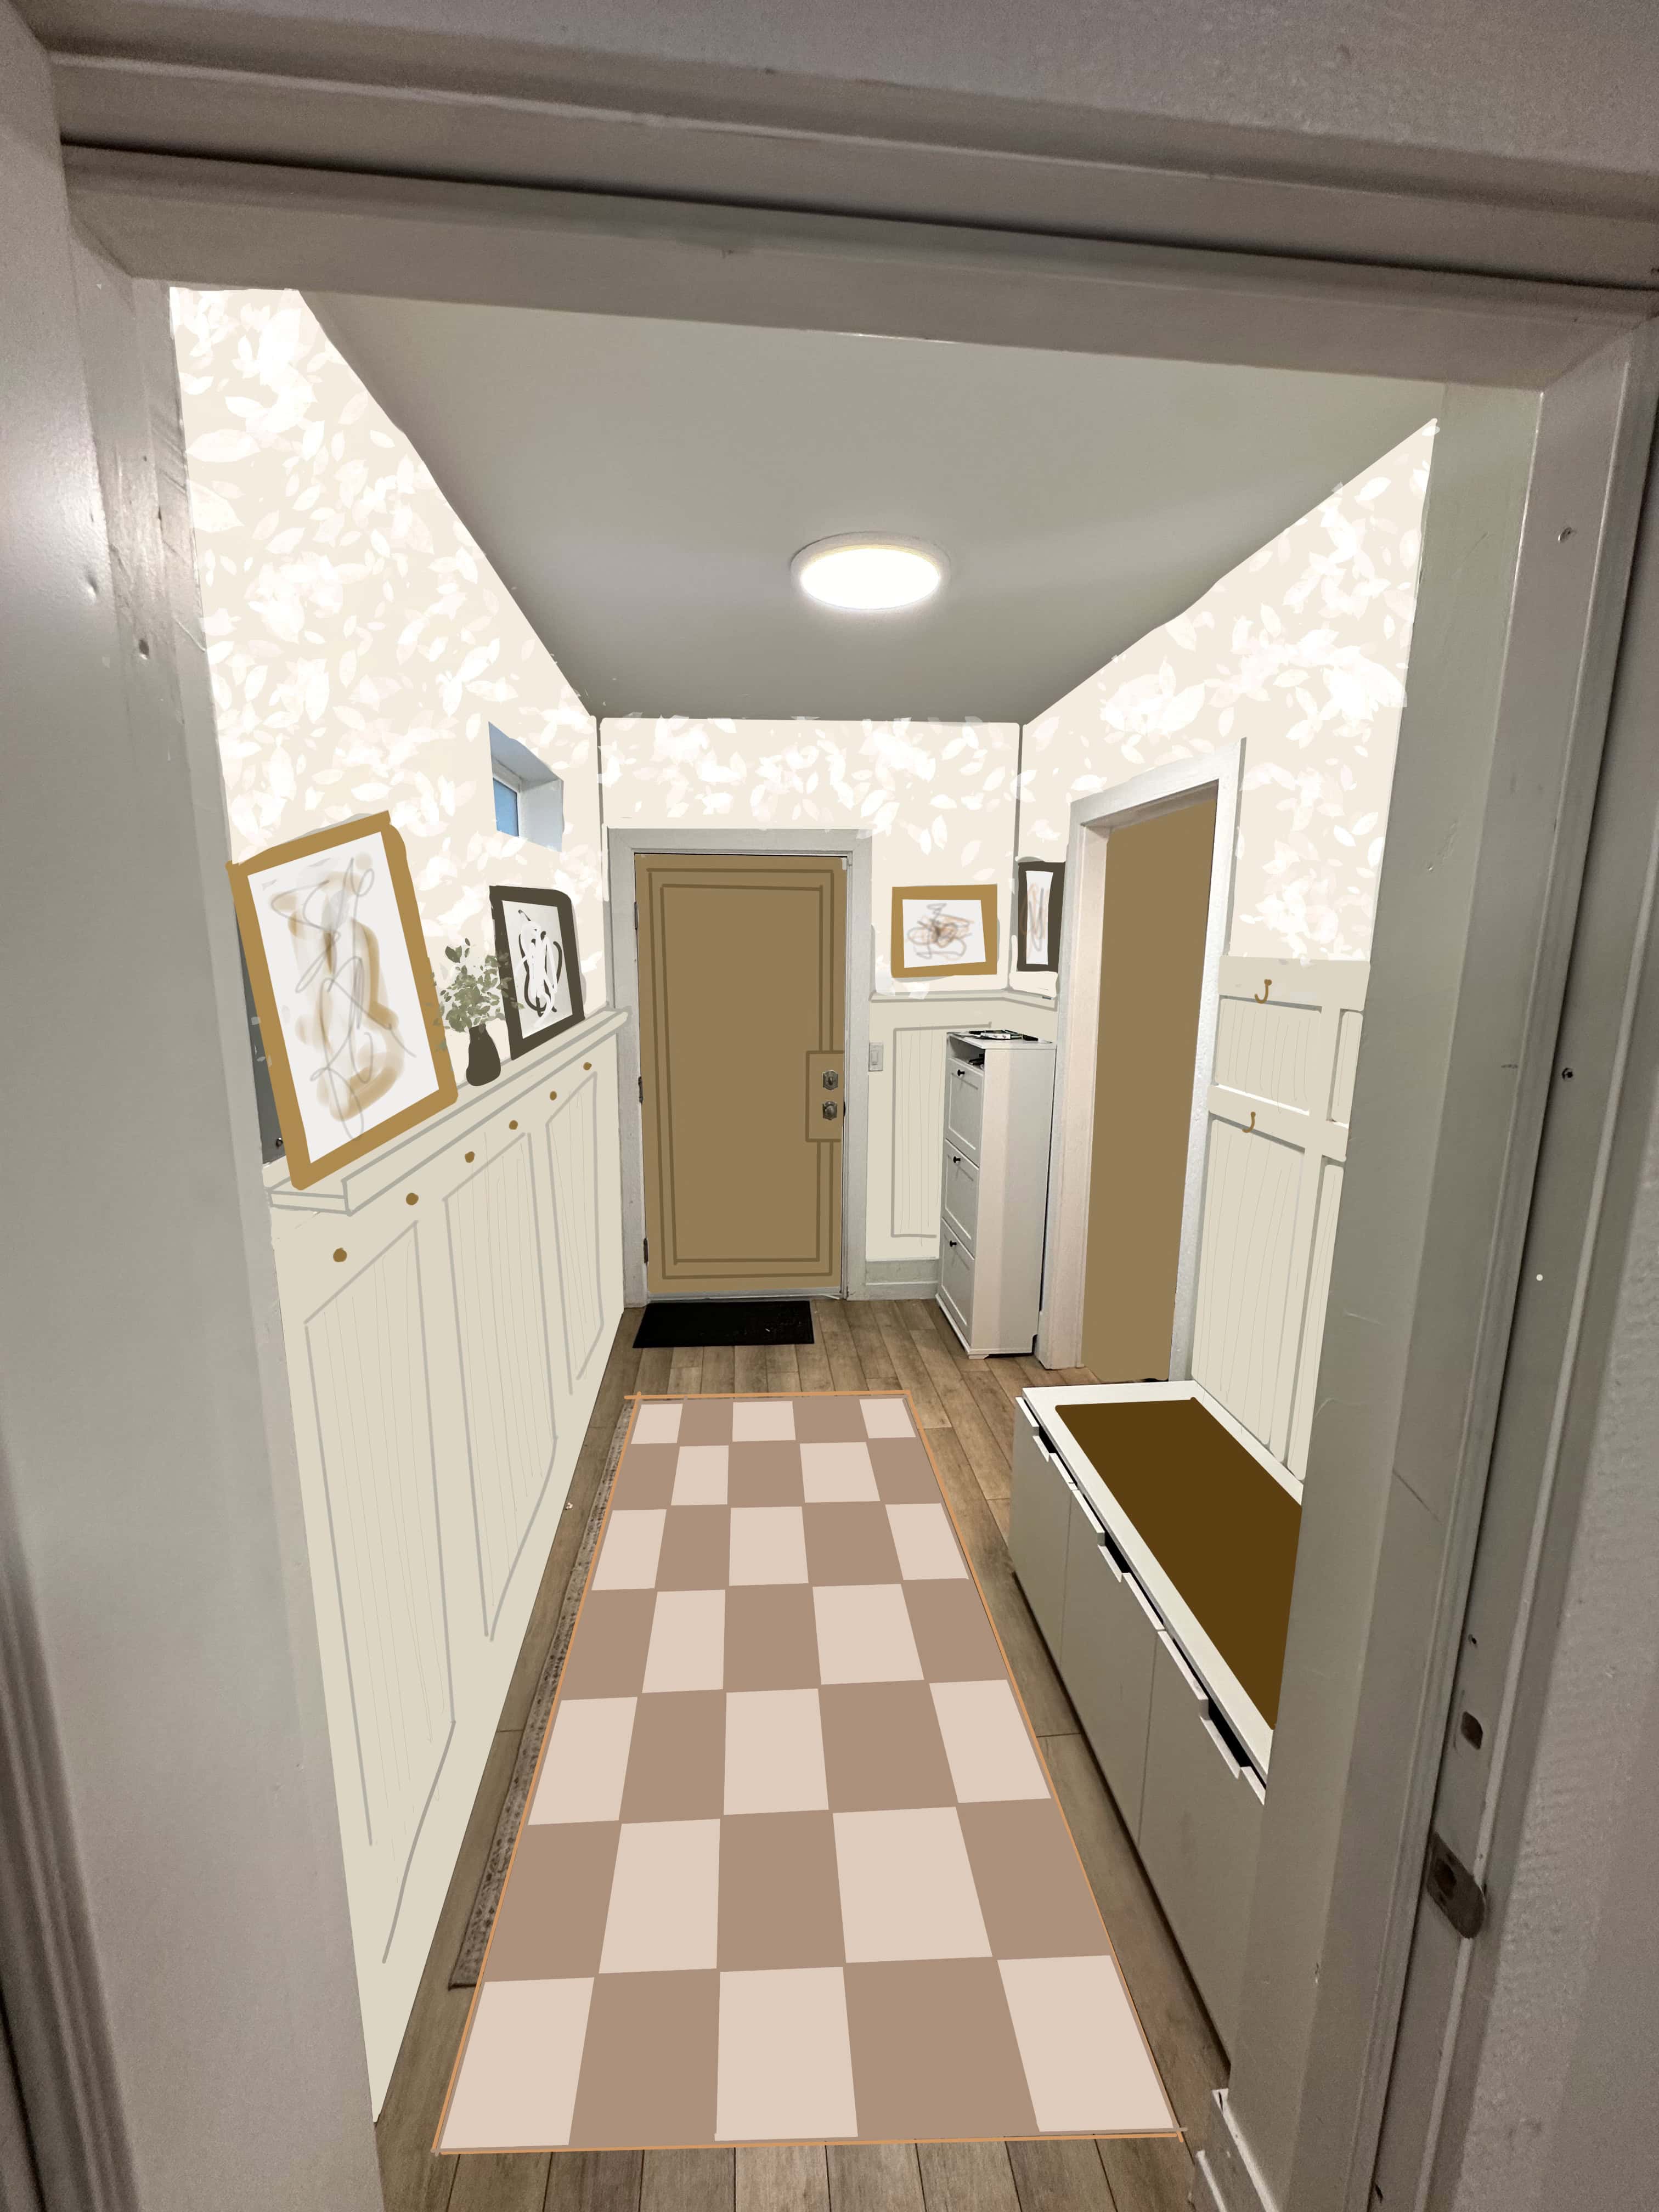
This is my digital drawing of my plans for the room. I always like to start projects by taking a photo and then drawing over it using a digital art program called Procreate. This allows me to see my ideas in the space and get a feel for colors.
I bought a super cute checkered rug like my original plan, but I ended up swapping it out for a darker one because it was just a little too light to stand up to our three kids and three dogs.
I’ll post part two when I figure out how to fix the concrete wall. But that is a project for another day!
Today, my stepkids need somewhere to hang their coats and backpacks and store their shoes.
For this phase of the transformation, we’re focusing on:
- Installing a board and batten wall with hooks for organization (on one side)
- Selecting and placing a durable, non-slip, washable, and heavily patterned mudroom rug that will hide dirt between washes.
- Adding a practical mudroom bench for seating and shoe storage
Creating the Board and Batten Wall
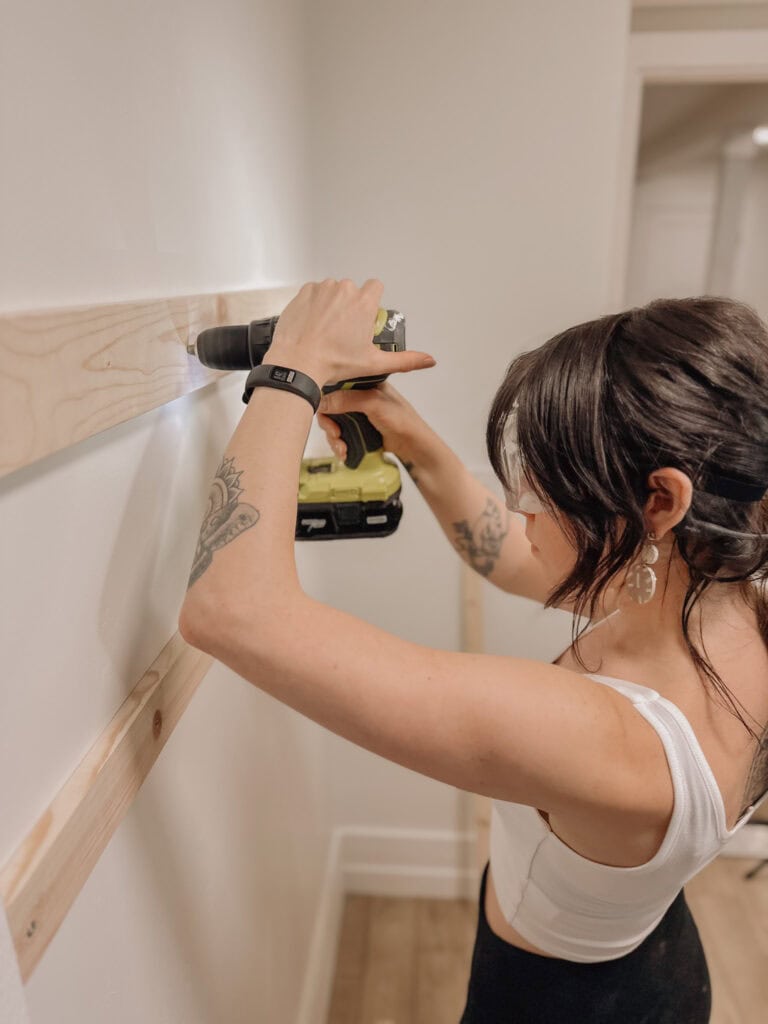
Here is where I need to remind you that I am DIYer, not a pro. But from what I have gathered from research and my own experience, most of the time board and battens can be installed with only construction glue (like Liquid Nails) and brad nails. But, because these are going to be used for three heavy backpacks, sports bags, and coats, I wanted them to be a little stronger. So I counter-sunk screws into the boards (the horizontal parts) and attached them to the studs. I don’t know if this was necessary, but I was worried about it not being able to handle the weight I needed it to hold.
Determine what you need from your board and batten wall for your particular space and use.
Start with a Plan!
Your board and battens can be any size you like, but the dimensions below are somewhat standard sizes. However, I chose smaller dimensions for this project. I went with a 1×6 for the top board, 1×4 for the middle board, and 1×2 for the vertical battens.
Also, you can use MDF or common pine boards if you don’t have a table saw. I don’t have a table saw (yet), so I opted to use pine. Pine boards are a little more expensive, but they are a great option if you don’t have access to a table saw.
If you opt for Pine boards, take time to select boards that look good. Look out for warping, rotting, or big knots. TIP: place boards on the floor of the hardware store to see how straight they are.
Also, pay attention to the way the boards were milled. Some will have straight 90-degree corners and others might be rounded. You can choose whichever you like, but I suggest choosing the same type for the whole project for consistency.
I’ll address more of the planning below.
What You’ll Need:
- 1×4 MDF boards for vertical battens (or common Pine in your desired size- 1×2, 1×3, etc.)
- 1×6 MDF pieces for horizontal boards (or common Pine in your desired size- 1×6, 1×8, etc.)
- Construction adhesive (like Liquid Nails) and caulk gun (trust me this is way easier than trying to squeeze and spread the glue out of tubes!
- Nail gun with 2-inch nails *If you don’t want to purchase a nail gun, you can rent tools from hardware stores, borrow from a friend, or you might have a free tool-lending library in your area.
- Stud finder and screws (if attaching to studs). If your board and batten wall is just decorative or will only be used for hanging light items like empty shopping bags, coats, baskets, etc, you likely won’t need to attach your boards to the studs. I did this because it will be used for three pretty heavy backpacks, band gear, and sports bags.
- Level
- Measuring tape
- Pencil
- Paint (semi-gloss works best for cleaning)
- Sandpaper (150 and 220-grit)
- Heavy-duty wall hooks (you can also find these at the hardware store)
- Saw for cutting Pine boards- I used a miter box to steady the wood and my favorite hand saw. But you can secure the wood with clamps too. My tried-and-true long-time favorite hand saw is the Vaughan Pull Stroke Handsaw. I have had mine for a decade and it is my go-to saw for every project.
The Process: Constructing Your Board and Batten Wall
This process can take anywhere from a day to a few days, but I suggest that you spend time making the plan and measuring the wall several times before buying and cutting the wood.
1: Plan Your Design- Start with Measurements!
Start by measuring the width of the wall where you want to place your board and batten.
Decide on your design: how high on the wall do you want the highest board? Consider the longest coat you might want to hang or the artwork size you want to display above. How far apart do you want the battens? Typical batten spacing is about 16-18 inches apart, but it can be whatever width works for you.
You will have to do a little math here! That math will depend on the width of your wall and the width of your battens. For my project, I was working in a small area and I knew I wanted three spaces, one for each child. So I took the total width in inches and subtracted the width of my 2 battens, and then divided by 3. This gave the dimensions for three even cubbies for each kid.
To give an example, if you want to add board and batten to a 10 ft wall:
10 feet = 120 inches
If using 1×2 battens, I would estimate that I will need about 6 battens for that wall (aiming for about 16-18 inches between battens.
120 divided by 6 = 20 inches
Multiply the estimated number of battens by the width of the battens (2 inches in this example). 6 x 2=12 inches.
Subtract that from your wall width. 120-12= 108
Divide that number by the number of spaces between battens (which will be one more than your number of battens). So in this case, with 6 battens, I will have 7 spaces. 108 divided by 7=15.43 inches between the battens.
If that works for you, great! But if you want them closer together or further apart, use more or fewer battens and recalculate.
2: Prepare the Wall
- Clean the wall surface thoroughly
- Use a stud finder to locate studs and mark your stud locations with a pencil

3: Cut Your Horizontal Boards and Install Your Framework
- When you have measured and made your plan, it’s time to cut the wood. For right now, only cut the horizontal boards. Wait until after they are installed to cut the battens!
- Most walls are not perfectly straight and even, so you might need slightly different lengths of battens at each point. More on that below.
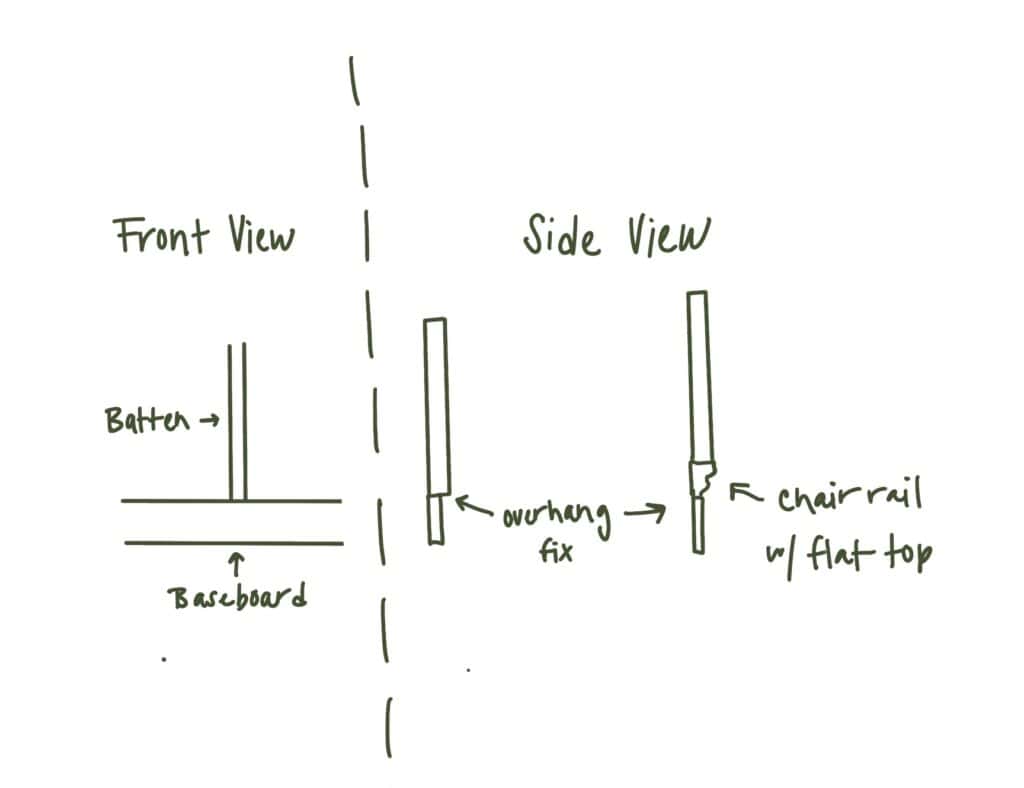
- Start with your horizontal boards: one at the bottom (right above the baseboard or use skip this and let the battens rest on the baseboard if possible), one at the top (based on the height you want- anywhere from 50-72 inches is average ), and (also optional based on your plan) one in the middle about 12-20 inches below the top board (according to your plans).
*Note on the bottom board: Every house has different baseboards. Your battens might not fit neatly onto your baseboards. You can fix this in several ways. You can remove the baseboards in the area and replace them with the boards you are using for the board and batten wall. Or you can make the existing baseboards work with some creative molding application. My favorite way is to use decorative molding that is flat on top, one inch deep, and tapered. Try something like this. You might need to try different moldings to make it work on your baseboards. You can use caulk to fill in any gaps.
Here is a simple drawing that hopefully demonstrates the above.
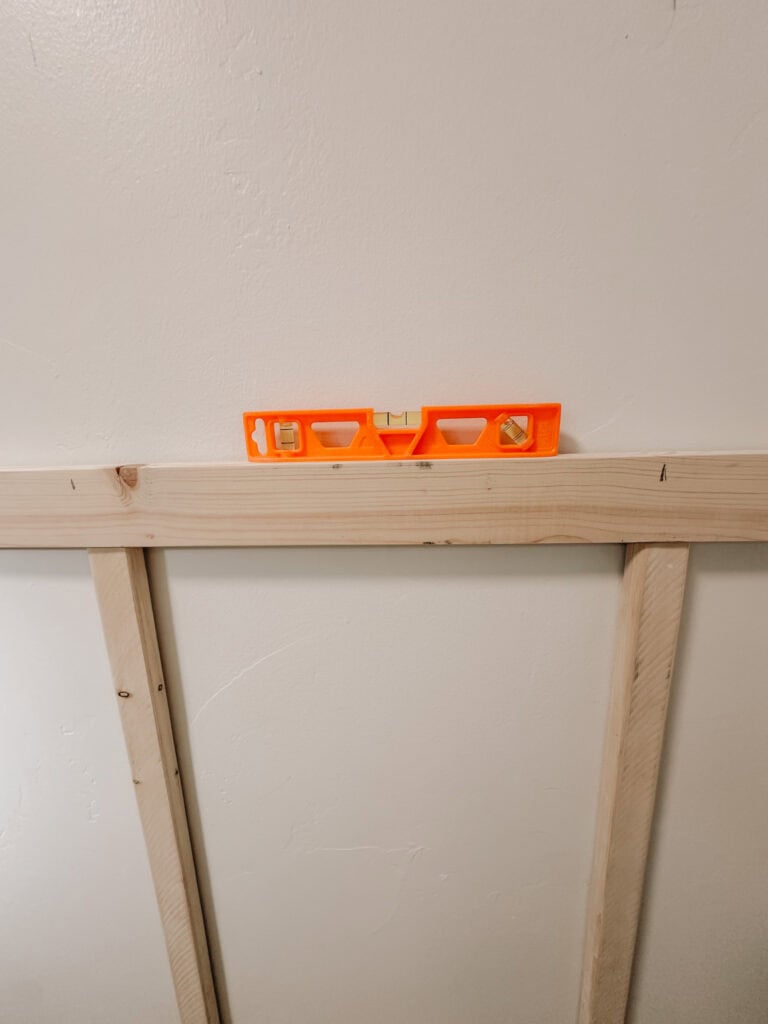
Install the Boards
- Use your level religiously here – this is crucial!
- Secure to studs and drywall with construction adhesive and nails
- (Optional) Use screws to secure the studs for extra stability and strength if hanging heavy items. Countersink screws to be flush with the surface.
- Predrill about 3/4 of the way through the board with a drill bit the size of your screw head. This will allow the head of the screw to sit below the surface. It can then be covered by caulk or wood putty. Please note that once covered and painted, it will be challenging to find the screws and remove the boards, so this is somewhat permanent.
4: Add Your Vertical Battens
Now that your horizontal boards are installed, it is time to mark the wall where you will place your battens, according to the plan you made.
Measure each space and record the number. I like to number the battens and write the length on the wall in pencil.
Then I mark that measurement on my 1×2 inch batten and number it to correspond to its position on the wall.
- Cut your vertical pieces to size between the horizontal boards.
- You really do need to measure each individual space for every batten as the space might be slightly different at every point along the wall. Most walls, floors, and ceilings are not perfectly level and straight. Measure twice, cut once!
- Space them evenly according to your measurements
- Attach with adhesive and nails
- Pro tip: Create a spacer block out of extra wood cut to your chosen width to keep spacing consistent
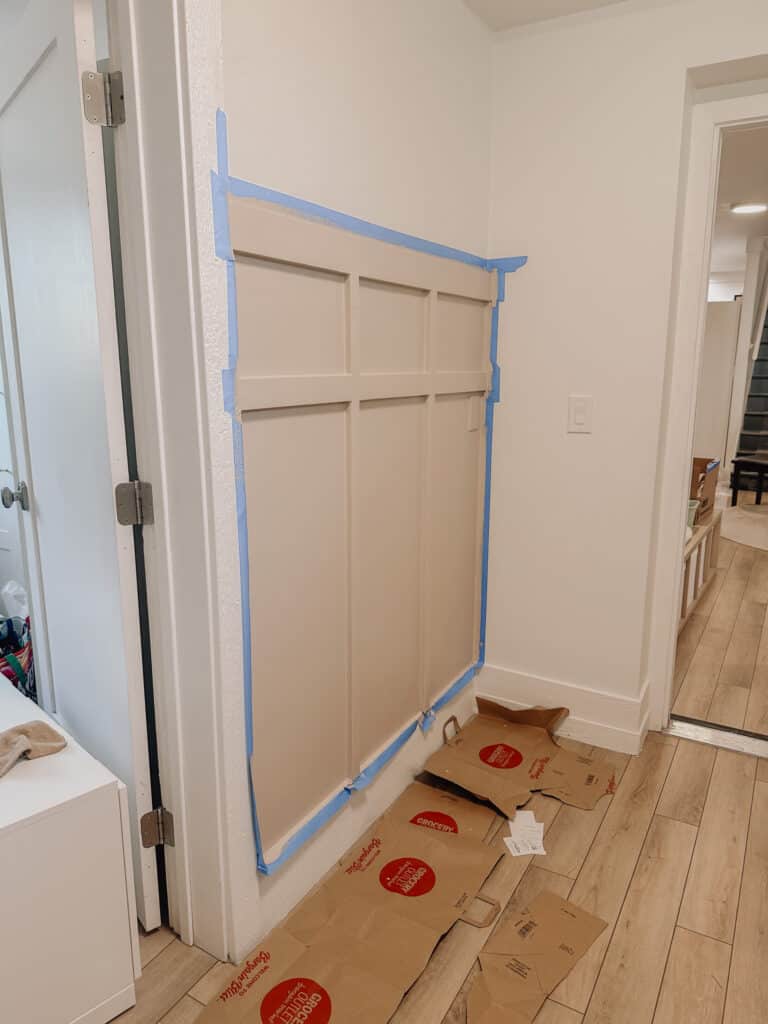
5: Finishing Touches: Trim and Caulk
- Add decorative trim along the top if desired
- Fill nail holes with wood filler and allow that to dry
- Sand everything smooth
- Caulk around the edges of each piece of wood.
- Apply a thin line of caulk and use a corner tool or your finger to smooth. Make sure you buy paintable caulk.
6: Paint and Hardware
- Tape off surrounding areas and give everything two coats of satin or semi-gloss paint (you can use whatever sheen you like, but those are the easiest for cleaning)
- Install heavy-duty hooks on the boards (horizontal) between battens at appropriate heights (lower ones for kids, higher for adults)
I primed the board and batten wall in white and then painted.

Your board and batten wall is complete! Now it’s time to decorate.
Choosing the Right Mudroom Rug
Your mudroom rug needs to be three things: durable, washable, and slip-resistant. This isn’t the place for your precious vintage Persian – you want something that can handle wet boots and muddy paws without flinching.
What to Look For:
- Indoor/outdoor materials
- Dark patterns or colors that hide dirt
- Flat weave and machine washable for easy cleaning
- Rubber backing for safety
- Size that leaves about 6 inches of floor visible around the edges of the space
I purchased this pretty checkered rug based on my initial vision for the space, but it clashed with my paint color. And after thinking about it, it was a little too light-colored for our family with three kids and three dogs. We need something darker and more heavily patterned that will hide dirt between washes. But it is super cute, very nonslip, and soft and I might try to find another spot for it in our house.
I then ordered this one charcoal and sage vintage-inspired rug and it’s perfect. It is inexpensive, non-slip, the right size for our mudroom, heavily patterned, and machine washable so it checks all the boxes. It is however very thin, but that’s fine. No one is hanging out in the mudroom for more than a few minutes, we don’t need a plush rug.
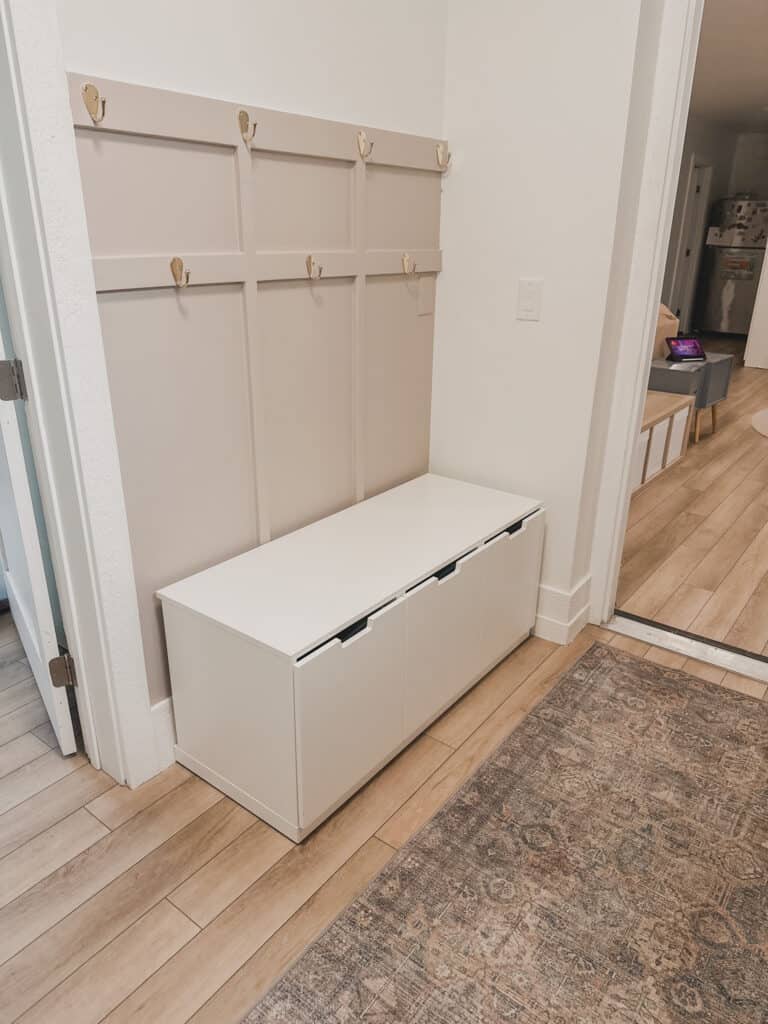
Adding a Mudroom Bench and a Shoe Cabinet
Our mudroom is connected to our laundry room and is divided by a door in the middle. So I had two small walls where we could add shoe storage.
I purchased one mudroom bench with three drawers for our three kids and a taller standing cabinet for my husband and me.
We got a mudroom bench and cabinet from Ikea last year, they are fine, albeit a little plain. If I were buying them today, I might have chosen something like these options that I think have a little more personality. I love this tall shoe cabinet in this cool blue-green/ grey. And if you have a smaller space or family, this darling wooden bench with room for 6 or so pairs of shows might be all you need. I included a few options that include the hooks, for those who can’t or do not want to add the board and batten wall for hanging coats.
Choose options that work for your space!
Click to shop these ideas!
The Final Layout (For Now)
Position your bench against the board and batten wall, centered under your hooks. Place your rug in front, leaving enough space for the bench legs to sit on solid flooring. This creates a natural “landing zone” where people can sit, remove shoes, and hang up their gear.
Tips for Success
- Install hooks at varying heights so everyone can reach
- Consider adding small name tags above hooks to assign spaces
- Leave some hooks free for guests
- Add a small basket on or near the bench for gloves and hats
Maintenance Notes
- Vacuum the rug as needed, shake out and wash the rug monthly
- Wipe down the board and batten wall as needed with a damp cloth
- Tighten hooks every few months
Looking Ahead
I still have to tackle the exposed concrete wall and add some color to this room with art and wallpaper. I might end up repainting the board and batten wall when I do, which again is what I love about board and batten! It’s a small but impactful design element that can easily be changed if the decor or design changes.
But for now, I am so happy to have finally finished the board and batten wall. Now, our kids have somewhere to store their stuff and I have a little less anxiety when I walk into the mudroom and am not confronted by things thrown on the floor.
I hope this gives you options for transforming your space into an organized entry point that works for your family or a gorgeous decorative element for any room. Remember, the best mudroom is one that fits your specific needs. Don’t be afraid to modify these plans based on your space and family’s habits. The goal is functionality first, style second – though with this board and batten wall, you’re getting both.
Stay tuned for part two of this mudroom transformation, where we’ll tackle that concrete wall situation and add some finishing touches to really make this space shine.
In the meantime, I just completed another bathroom makeover in our basement bathroom and I LOVE how it turned it out! I went out of my comfort zone and used bold patterns, materials, and colors. Read the full post on that makeover here.


Join the List
Stay up to date & receive the latest posts in your inbox.